This guide details how to remove the nasty Mk1 dash and fit the nicer, more modern Mk2 dash to your Mk1 Nova. The test vehicle used was a 1987 (E) base spec with a 1991 (J) GSi dash going in, although the process and wires should be the same for any Mk1 and Mk2 Nova.
I prefer to crimp my wires together, as this is easily removed later if you want to change some of the wiring or in case you make a mistake. Plus its a lot easier than soldering!
NOTE: I have written this guide mostly from memory and by poking at my currently semi-dashless saloon, hence no pictures. Consider it to be a rough guide, you may find one or two small things I've left out - if so, please post. HOWEVER, the wiring should be kosher as I've just spent most of two days with my head in Haynes checking all the wires, and have wired said test vehicle as such
Tools required:
Flat bladed screwdriver
Philips screwdriver
Star/Hex keys
10mm spanner or socket
Crimp connectors
Crimping tool
Items required:
Mk2 dash with all cowling
Mk2 heater cables
Mk2 steering column shroud
Mk2 switches (Headlight, Foglamp, Hazard, Centre Heater/Blower) with plugs and wires
Mk2 centre console (not essential, but recommended)
Mk2 heater ducting (all 3 pieces) if you want the side vents to work.
Step 1. Removal Of Mk1 Dash Attachments.
Remove the under dash tray (if present). Undo the three screws on the lower portion of the steering column shroud, and remove both bottom part then the top part (top may require some jiggling to get round the ignition barrell but it will come out). Mk1 dials are not held in by any bolts, so you can just push them out from behind - you'll need to undo the connector block and speedo cable. Remove the glovebox, this has four screws on the front - 2 above the door (open it to see them) and two below. Remember to undo the glovebox light as you remove it! Undo the heater control rods from the heater end, one blue clip either side. Remove the radio if required.
Step 2. Removal Of Mk1 Dash.
Undo the two philips screws either side of the dash (open the doors to see them). Undo the two 10mm nuts holding the top of the dash in place, these are located one behind the glovebox and one behind the dials, both just under the windscreen. Withdraw the dash slightly, and reach behind to unclip all the switch and light plugs.
Step 3. Connecting Mk2 Switch Plugs.
With the Mk1 dash removed from the car, its time to concentrate on the switch plugs. There are four main plugs: headlamp, hazard, heated RW/blower control and foglamp.
Headlamp
The Mk1 headlamp plug fits the Mk2 headlamp switch - HOWEVER, the Mk1 plug does NOT fit the Mk2 cowling. You need to chop the Mk2 plug on, but all the wires swap like for like.
Hazard
The wires are the same, but in different locations. Chop the Mk1 plug off the loom, and attach the Mk2 plug colour-for-colour.
Heated RW/Blower
Whilst the Mk2 switch fits the Mk1 plug, it won't function properly - Vauxhall swapped some of the wires round. Chop the Mk1 plug off the loom and connect the Mk2 as follows:
MK1 BL - GE MK2
MK1 GR - GR MK2
MK1 GE - SW MK2
MK1 BR - BR MK2
MK1 BRWS - BRWS MK2
MK1 SW - BL MK2
The top two connectors are for the illumination. If you are using a mk2 plug, these can be left alone. If you are rewiring a Mk1 plug, the chop looped black wire off at the end where i connects to the main feed black wire, and connect to the blue wire.
[EDIT] Note, this implies using a Mk1 plug on a Mk2 dash, i.e. having to cut the plug off and reconnect as above. If you're using a Mk2 plug, just connect colour for colour (which I think is where some of the confusion has come into the replies about this)
Foglamp
This one looks harder than it is. The Mk1 connector has 3 pins, whilst the Mk2 has 4 pins. However, the Mk2 has a looped connector on pin 4 (to pin 3) - follow the Mk2 loom up from the switch and you will see the looped connection. Ignore this loop and leave it as is, connect the grey/green wire that goes off into the loom to the yellow wire on the Mk1 loom.
Connect up any further illumination lamps.
Step 4. Install Mk2 Dash.
Position the Mk2 centre heater ducting atop the heater matrix. Insert the two side ducts if required (NOTE: if you have a poverty spec Mk1 heater, you will either need to cut out the side holes on the heater, or replace it with a Mk2 one). Place the Mk2 dash frame (i.e. no glovebox or cowling) into location, and put the switch wires into their appropriate places. Replace the 2 side screws on each side of the dash, and then the two nuts that hold the back of the dash in under the windscreen.
Step 5. Installing Mk2 Dash Attachments.
Connect cigarette lighter. Insert lamps for illuminating rotary controls. Connect heater control cables to heater (and rotary controls if not already on). Install centre vent cowling (with hazard switch) - one philips screw . Install right side cowling (with headlamp and foglamp switch). Install glovebox and attach glovebox lamp feed. Install steering column cowling (top half first, then lower half) and refit the 3 screws into the lower section as per Mk1.
Step 6. Installing Dials.
If using the Mk1 dials, follow section A. If using Mk2 dials, follow section B.
A. Using Mk1 Dials
From the drivers position, looking into the dialset space, there will be a top mount. Bend this down, and fit a bolt or large screw to it (tight). This will wedge the top half of the Mk1 dials into place. Connect the speedo cable and connector block to the back of the Mk1 dials, and push into place so that the bolt in the top mount pushes the dials outwards slightly. Install the dial cowling and screw into place (4 screws).
B. Using Mk2 Dials.
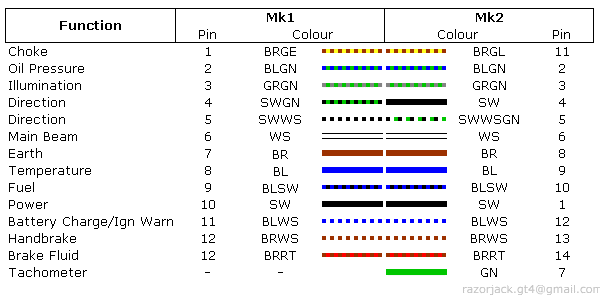
Mk2 dials have a 14-pin connector block, whilst the Mk1 has a 12 pin connector block - these need to be chopped over to allow the Mk2 dials to fit (Notes on this below). The speedo connects exactly the same. The Mk2 dials will also have three mounting points allowing it to bolt into the dash - fix a bolt in each, then fit the dialset cowling with the four hex screws to finish.


 Reply With Quote