
cheers benn, would be nice to have it ready for the action day in sept but may be pushing it.Originally Posted by Benn

I do like a nice clean bay


cheers benn, would be nice to have it ready for the action day in sept but may be pushing it.
I do like a nice clean bay

Not ready for pv then...
All I wanted was a Pepsi, just one PepsiFar from suicidalStill I get them tendenciesBringing back them memories
That I really miss when I reminisce
no.
really keen on spectating this year though, just hope the weathers good.
Shame, but cool.
All I wanted was a Pepsi, just one PepsiFar from suicidalStill I get them tendenciesBringing back them memories
That I really miss when I reminisce
update
nothing spectacular for an update, few more parts have arrived so more of the puzzle is coming together.
finished painting the fuel rail in black
removed a few lugs off the turbo compressor housing and then painted in VHT paint.
as I already had a forge actuator for my old k16 (which I changed to a higher rated spring just after I stopped using it), I wanted to keep it and hopefully mod it to fit the evo turbo. I contacted forge about this and they sent me a host of parts.
some wernt needed and a slight modification to the rod meant it fitted quite nicely.
got the valves out of the head ready for my new valve springs to turn up, was expecting them to arrive this week but they havnt. gave the inlet port a slight taper to match the gasket/inlet manifold aswell.
a set of china special conrods came in the post aswell, I have been quite dubious about getting a set of these but after very close inspection by me and a few colleagues they seem pretty good quality. even comparing them to a set of cat cams and arrow rods, they look nigh on identical in finish. whether they can with stand the same sort of forces will be told in time
also to come in the post was a set of ARP head studs and a wide band lambda bung. more parts should be coming next week.
I need to get on with the bay ready for paint but ill be waiting until I can move it up to a mates workshop after PVS
thanks for looking.
Last edited by brucer; 31-05-14 at 05:09 PM.

Nice work brucer
Really like clean parts
me too
update
Since the last update ive been pottering on with various bits and bobs, the gearbox being an item of many. I wire wheeled all the old paint off and gave it a a new coat of silver, along with cleaning up the carbon fibre plate which makes it very sexy.
One thing I did notice was that the gearbox mount had broken off the top bolt hole on the box, now it would have made more sence to have it repaired if I had the bit that had come away or more time and money. With set on making something work for now I decided to make a new plate that would tie in with the other 2 bolt holes and then attach to the back of the block.
The plate was made and should hopefully work, trial fitment will have to wait until the engine and box go back together. I do have a steel tube to go between the plate and the block.
Whilst on the gearbox area, I retried my rose jointed gear linkage I made years ago. Im still not happy with how tight it is and with it being impossible to set it up correctly when I tried ages ago I gave up on the idea. The linkage I was using was a standard item but it had play in the bushing, with always trying to save money I devised the plan to cut it open and fit some rubber pieces I had about into it. This was done and then tacked back up, it took all the slack out and will be ok for now.
Onto the car, I took it into work so I could weld up some of the holes I didn’t want any more. Also tidied up various other engine bay discrepencies.
Some people may know I usually run the engine loom through the o/s cap that bolts onto the bulkhead. Space is very limited in the cock pit due to the pedal assembly. Using a small belt/finger sander I managed to take some of the material away leaving me much more room to play with. The Z20LET loom isn’t as big as C-LET so this should be ideal.
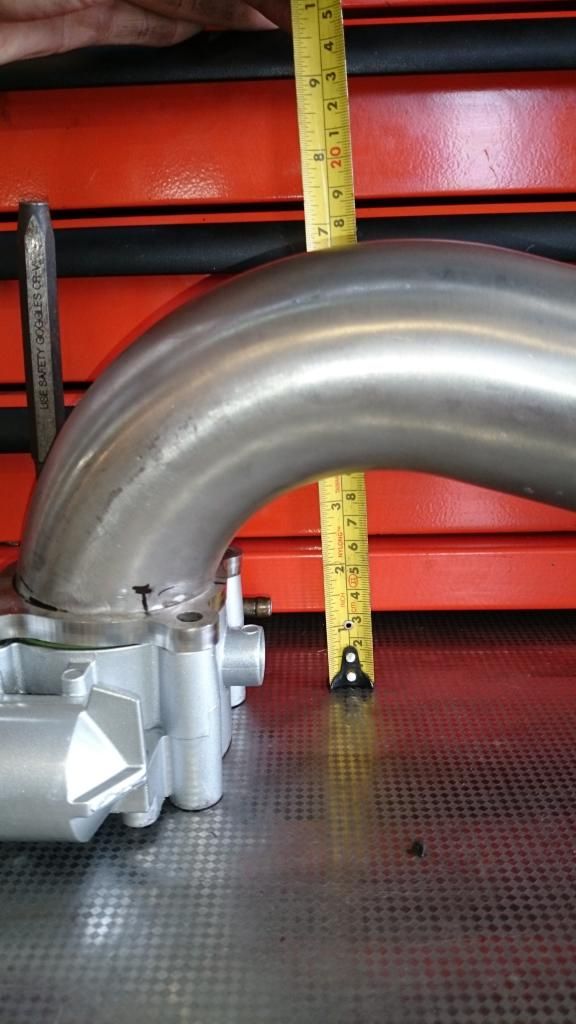
Another way I was trying to save money was to make my own top hat for the Z-LET throttle body, the flanges can be bought off eBay along with a 90degree stainless pipe.
I had to bore the flange out to get the angle I wanted with the pipe, was somewhat limited due to how the flange sits on the throttle body with the sealing ring. This will get welded up by Adam dewis along with my intercooler and my sump.
Last edited by brucer; 26-07-14 at 07:07 PM.
As my one rubber engine mount had torn slightly I didn’t want to re-use it, a quick call to euro car parts and I got a new one for £12. The previous ones had been filled with silicone but read somewhere that they fitted bits of rubber in-between to increase rigidity, tyre valves were the item of choice and done a good job in filling the small holes once cut up.
David Dixon come up trumps with an equal length shaft which I then painted black, also Alex j sold me the dummy part to make a complete set up, this too painted in black and silver.
Tidying up the engine bay even more was to get some pipes added to my intercooler, I really didn’t plan on cutting the intercooler as it’s a forge item and for some reason I just didn’t want to do it, but I had no choice to as it gave the angles I needed.
I took the block into work and stripped it down ready for the new rods, these got fitted quite simply.
I gave the bore a quick deglaze and got the pistons back in, I then found out the ARP rod bolts that came out of standard rods didn’t fit in the new rods. Doh! I got the pistons fitted and cable tied the big end caps together temporarily.
Ill be sending the sump off to Adam dewis to be baffled along with the other bits that need welding, so this was only fitted with a couple of bolts.
ARP studs fitted along with a new Z20LET elring gasket.
Head torqued down, cam pulleys fitted and timed up, I had to return the inlet pulley back to standard timing marks as im now using both XE cams.
As im using the z20let coil pack I had to modify the cam cover slightly for it to fit, I was hoping it would be mounted low enough so the plug cover would still go on. I wanted to remove minimal material from the cam cover for the coil pack to fit, in doing this I had to modify the plug cover.
It sits up higher on the one side which I cant help as the coil packs plug is the highest point, I may use Velcro to stick it down which will level it out even though it will be higher than the cam cover. Will have to wait and see on that front.
Also fitted was the alternator with drilled out mounting bracket holes, this has given me more scope for aligning the belt as before it was on an angle and kept coming off. I lost one belt on the strip at shakey.
Next week will see the engine bay painted and hopefully the engine fitted back into the bay. Yippee!
Thanks for looking.
Bruce
Last edited by brucer; 26-07-14 at 07:12 PM.
Tasty looking engine Brucer, what power are you aiming for this then?
Posting Permissions

 Reply With Quote


