Page 1 of 3 123 LastLast
Results 1 to 10 of 21

Thread: How To: Nova C20xe Wiring

  1. #1
    Senior User
    Join Date
    Jul 2002
    Posts
    7,862
    Post Thanks / Like
    Mentioned
    0 Post(s)
    Tagged
    0 Thread(s)

    Default How To: Nova C20xe Wiring

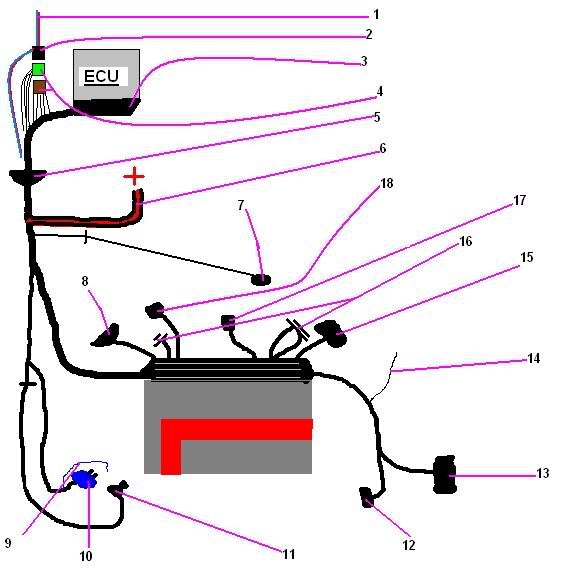
    Right, hope I haven't forgotten any wires here, otherwise be pretty useless

    This is for a DISTRIBUTOR C20XE, the dispacks are identical apart from they have on more plug for the dipack unit.

    Maybe make this a sticky seeing as its a common topic/problem?


    ALL WIRES/PLUGS ARE BLACK UNLESS STATED OTHERWISE

    WIRES FROM THE DIAGRAM:

    1- This is the wire which goes to the fuel pump, the fuel pump live. It is blue with a red trace, as illustrated.

    2- This is the Fuel Pump Relay, they have a few wire going into them and only one coming out which is item 1 on the diagram

    3- This is the big plug which goes into the ECU, It has a silver clip which you push down to secure the plug into the ECU, these can be tricky to master the first few times you do them!

    4- These are the dash signal plugs, out of these two you will use the following wires:

    BLUE- Temperature Display for Dash, to BLUE on Nova dials
    BROWN with BLUE trace- ECU warning light, colour for colour on injection Nova dials/Digidash, unless it was a carb model, in which case, use the choke light as a ECU light, which is BROWN with YELLOW trace
    GREEN- Tachometer (rev counter) goes to GREEN on nova dials


    5- This is the gromet bung which is where the wires will go trhough to the inside of the car through a 60mm hole you drill in the bulkhead. TIP: you need to cut the tape holding the bung in place and slide it down towards the ECU plug for a better fitment

    6- This is the Permanent live for the ECU, it is a red wire, in a black sheafing, it should have a ring terminal on the end, it goes to the positive side of the battery

    7- this is the three pin plug for the Lambda Sensor, the line going through indicates that the plug should be around here somewhere.

    8- This is the plug for the Air Flow Meter (Commonly known as AFM) Think it has 7 pins?

    9- This is the coolant temperature wire, it is blue and simply pushes onto the nipple next to the Coolant Temperature Switch.

    10- This is a blue plug with 2 pins, it goes to the coolant temperature switch sensor (commonly known as CTS Sensor). This is located at the front of the block by the top rad hose

    11- This is the Crank Position Sensor,, it goes in the lower front face of the block, it is held in by one bolt. The line further up the loom towards the ECU indicates a plug for it

    12- This Plug goes into the Hall Sensor on top of the distributor, it has 3 pins, you really cant miss this one!

    13- This plug goes into the coil.

    14- This is the switched live (a.k.a. Ignition Live). This should go to a 12V igtion live source, this will turn the ECU on and off with the ignition.

    15- This is a 5 pin (I think?) plug which connects to the back of the block loom. It will be down by the speedo cable drive somewhere. (The loom from the back of the block should include, knock sensor, ICV etc)

    16- These are earth, 3 separate wires, one on cambelt end, 2 on gearbox side, they should be earthed to the fuel rail.

    17- This is the plug for the Fuel Tank Vent Valve, it is a 2 pin plug. It goes at the very end of the block, usually bolted to the bottom stud of the inlet manifold (gearbox end)

    18- This is a plug for the Throttle Position Sensor (TPS) It is located on the cambelt side of the throttle body.

    Other Wires

    You need an earth that goes from the gearbox to the chassis.

    You also need to connect the starter motor live to the +ve side of the battery

    From the Nova Engine Loom (found by brake fluid reservoir), you also need to connect the black with red trace to same colour on the engine loom at back for the starter motor. Again from the Nova loom, you need the blue with white trace as the remote wire for alternator, to the same colour on the XE loom. Again for the Oil pressure, you need to connect the blue with yellow trace and blue with green trace to the XE Oil Pressure sender, this is found down behind the Oil Filter.

    Hope this of some help to some of you,

    Paul
    Last edited by Paul; 10-12-07 at 11:09 PM.

  2. #2
    Senior User Ste L's Avatar
    Join Date
    Jun 2004
    Location
    Sale, Manchester Drives: 106 16v Rallye
    Posts
    6,490
    Post Thanks / Like
    Mentioned
    0 Post(s)
    Tagged
    0 Thread(s)

    Default

    nice guide paul

  3. #3
    Moderator Mazz's Avatar
    Join Date
    Jun 2005
    Location
    Stafford.........Drives : Audi A4 + NOS Nova GT'XE
    Posts
    6,657
    Post Thanks / Like
    Mentioned
    1 Post(s)
    Tagged
    0 Thread(s)

    Default

    oooh, bookmarked for a rainy day! Thanks
    (┌∩┐(◣_◢)┌∩┐)

  4. #4
    P N G Adam's Avatar
    Join Date
    Nov 2003
    Location
    Stoke-on-Trent
    Posts
    30,497
    Post Thanks / Like
    Mentioned
    0 Post(s)
    Tagged
    0 Thread(s)

    Default

    At last, someones done a decent Xe wiring guide. Lol
    Paul, add to the Other wires bit, the oil pressure wires too. Blue/Yellow, Blue/Green. There on the nova loom same as starter solenoid wire, and alternator wire.

    Definently needs to be stickied.

  5. #5
    Senior User
    Join Date
    Dec 2005
    Location
    Wiltshire
    Posts
    3,150
    Post Thanks / Like
    Mentioned
    0 Post(s)
    Tagged
    0 Thread(s)

    Default

    Thats just what i need, all i need now is a new loom! Brilliant positive rep

  6. #6
    Senior User
    Join Date
    Jul 2002
    Posts
    7,862
    Post Thanks / Like
    Mentioned
    0 Post(s)
    Tagged
    0 Thread(s)

    Default

    Edited, Thanks Ad

  7. #7
    Senior User The Simps's Avatar
    Join Date
    Apr 2002
    Location
    Norwich
    Posts
    5,659
    Post Thanks / Like
    Mentioned
    0 Post(s)
    Tagged
    0 Thread(s)

    Default

    Quote Originally Posted by Paul
    Edited, Thanks Ad
    Just to clarify that further.

    You use the mini loom that is originally on the nova that goes to the starter alternator etc NOT join the wires in the XE loom. You see so many XE/LET conversions where they've used all the starter loom and big round plug from the donor car an there's just no need.

    The only problem you'll have with the above is if the engine came from an astra GTE 16v which didn't have the 3 plugs but 1 big one instead. Also there is no seperated igntion live (14) its part of the plug.


    All in all tho mate, great thread!

  8. #8
    Go low or Go home. Moderator Benn's Avatar
    Join Date
    Mar 2004
    Location
    Fareham, Hampshire
    Posts
    23,813
    Post Thanks / Like
    Mentioned
    12 Post(s)
    Tagged
    0 Thread(s)

    Default

    Any one that cuts and joins the looms for the starter/charging loom is a nugget. You should never see an x5 (big round plug) in a nova bay.
    Last edited by Benn; 10-12-07 at 11:06 PM.
    All I wanted was a Pepsi, just one Pepsi
    Far from suicidal
    Still I get them tendencies
    Bringing back them memories
    That I really miss when I reminisce

  9. #9
    Senior User
    Join Date
    Oct 2007
    Location
    Blackburn
    Posts
    5,287
    Post Thanks / Like
    Mentioned
    0 Post(s)
    Tagged
    0 Thread(s)

    Default

    what an ace guide. looks straight forward now Lol. when im fitting my valver il definetly be using this, cheers mate

  10. #10
    Club Member Club Member womble sri's Avatar
    Join Date
    Jan 2005
    Location
    Hertfordshire, United Kingdom, United Kingdom
    Posts
    1,696
    Post Thanks / Like
    Mentioned
    0 Post(s)
    Tagged
    0 Thread(s)

    Default

    good guide defo sticky it nica art work there too paul

Posting Permissions

  • You may not post new threads
  • You may not post replies
  • You may not post attachments
  • You may not edit your posts
  •